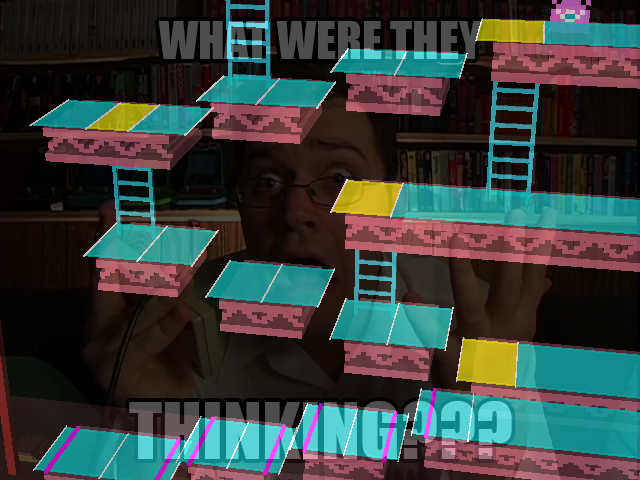
75 m, The Smash Bros. Stage I Know Too Much About
Ah yes, 75 m. The stage we all know and hate with a burning passion in our hearts. I’ve always found the design of this stage from the past two installments of Super Smash Bros. quite unappealing and unfun to play on as a result. I guess you can partly thank the previous ownership issues regarding the original arcade game with Ikegami Tsushinki for that.
Though, as with many things, sometimes it takes a few tries to get something just about right. Super Smash Bros. for Wii U notably removed the walk-offs from the right side of the stage, essentially giving us the layout we have today. Then Super Smash Bros. Ultimate came along and changed the game for this stage, though we’ll get nitty-gritty in a bit. I would say it’s one of my favorite stage redesigns from Ultimate for what it’s worth.
Now why on earth would I want to write such a comprehensive write-up about one of the Smash universe’s most disliked stages? Well the up-front reason could be considered a bit cheesy, but it’s because I can. I thought it would be neat to write about my findings in full length for once and teach those who might be interested in understanding what goes on behind the scenes and/or learning about the miniscule details like I am. I did actually have to learn how this stage functioned in its near entirety during my time working on a particular mod that I’m sure at least some of you reading this are aware of by now.
So what exactly will be discussed here? You will learn about the origins of the stage, its initial debut in Brawl, its port to Super Smash Bros. for Wii U, its aesthetic overhaul in Ultimate, and a reverse engineering of the stage’s elements and hazards as of Ultimate. Keep in mind that this write-up will be extremely lengthy and touch on a bunch of insignificant bits, so I don’t blame you if you lose interest or if your attention span wanders elsewhere at some point during the reading.
Before we jump in, I’d like to give a huge thanks to jam1garner for teaching me some beginner’s basics on reverse engineering! If it wasn’t for him, neither the mod this research went into nor any of the research from the game’s executable itself would have been fully possible. Lastly, if you’d like to contact me for whatever reason, feel free to do so on Discord at ThatNintendoNerd#3684
The Origins
Everybody and their cat should know where this stage is from, but I thought I’d go over it anyway for the sake of completeness:
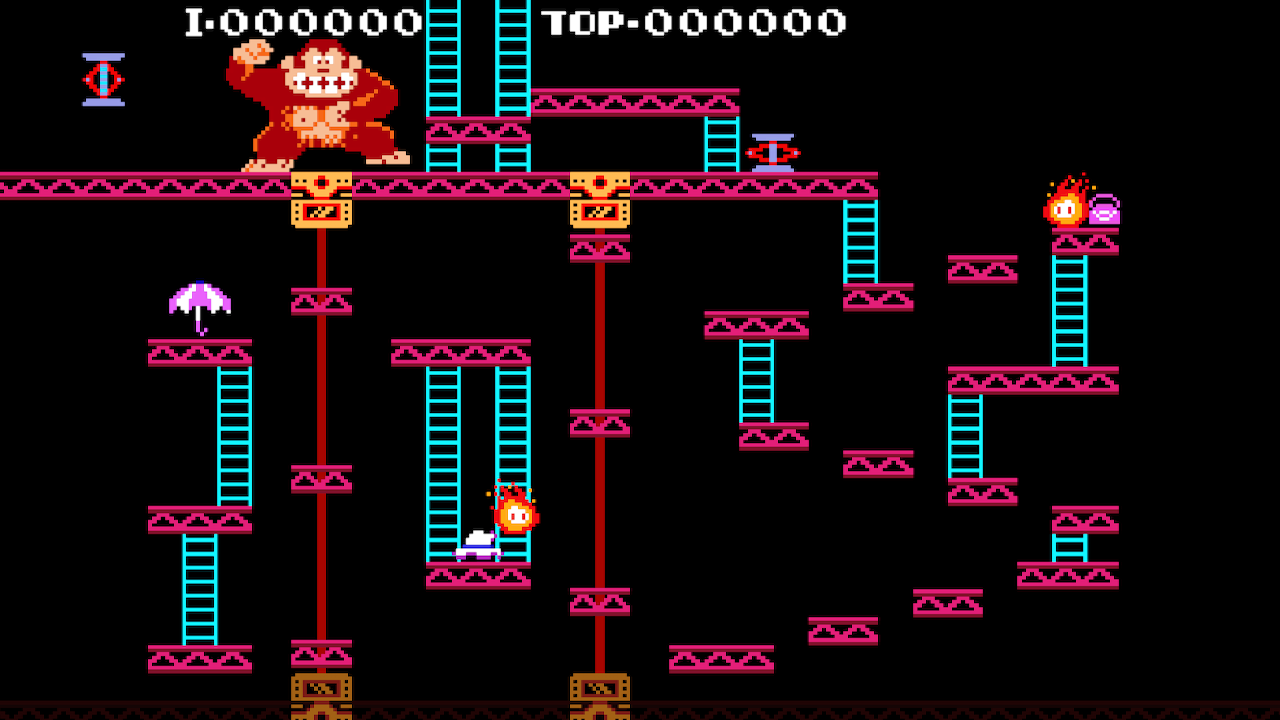
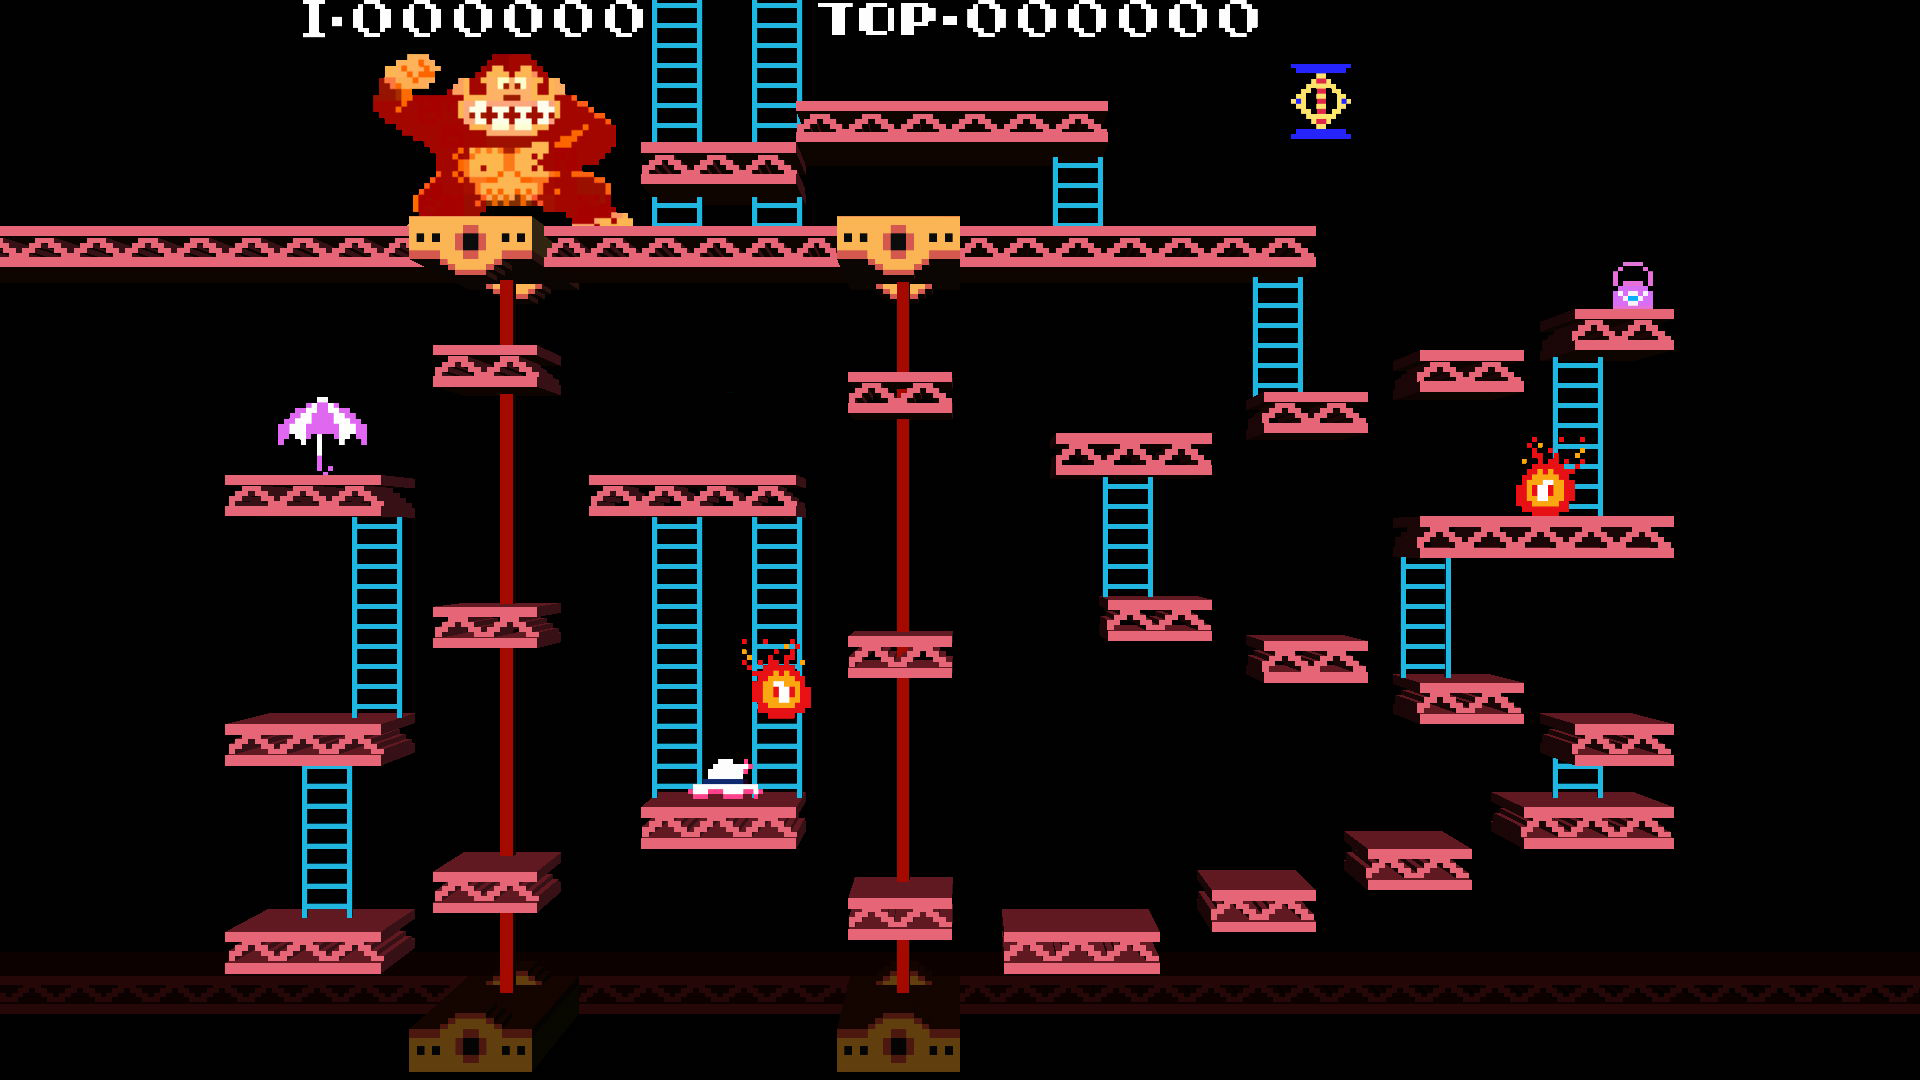
75 m holds its origins in the hit arcade classic Donkey Kong, developed by both Nintendo R&D1 and Ikegami Tsushinki. After making your way through a few levels, you will reach 75 m. In this level…
| Key | Description |
|---|---|
 |
The layout is much more segmented and scattered about compared to previous levels. As a result, there is much more room for error in your platforming skills to end up plummeting to your demise. |
 |
Two sets of lifts move in a one-way direction opposite of each other. Staying on a set of lifts for too long will eventually result in the player's death one way or another. |
 |
Jacks bounce across a platform and fall out of the level in a repeating cycle. Contact with one will instantly kill the player, but jumping over one can actually award them 100 points. |
 |
Two Fireballs each patrol a separate set of platforms and spawn with the level rather than from a burning oil drum like in 25 m and 50 m. These little trouble bugs are no longer destructible due to the lack of hammers in the level. Jumping over one will award the player 100 points. |
 |
A parasol, hat, and bag, all belonging to Pauline are scattered throughout the level. Collecting one awards the player either 500 points or 800 points depending on what set of levels they're on. These items do not respawn after being collected. |
 |
Donkey Kong is obviously present in the level but doesn't do much outside of pounding his chest every so often. An invisible barrier prevents the player from coming in contact with him. |
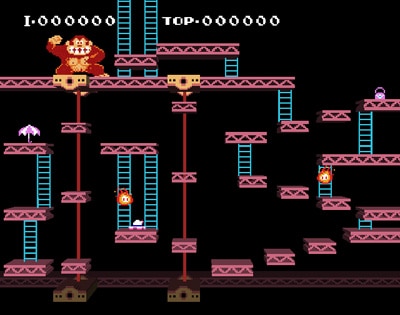
The game was a smash hit in the arcade. Many game publishers had their hand at porting the title to their home consoles, but none of them really held the same charm as the arcade. They usually lacked in graphics or content due to the limitations of their hardware or from cartridge expenses. However, the Famicom, NES, and Famicom Disk System ports were the ones that really hit the nail on the head. While not arcade-perfect, it was pretty darn close and holds up significantly better than any of the other ports the game received at the time.
A few lawsuits struck Nintendo during the game’s surging popularity, the most relevant ones involving Ikegami Tsushinki themselves suing Nintendo for manufacturing more boards than initially agreed upon under contract.[1] They also sought compensation for code that was reverse-engineered in the original arcade game for the programming of Donkey Kong Jr.[1] These lawsuits and disputes are believed to be the reasons why the arcade game was never officially rereleased. However, it wasn’t until June of 2018 when HAMSTER Co. released Arcade Archives DONKEY KONG for the Nintendo Switch, causing rising speculation that the copyright limbo the game was believed to be in has finally ended.
[1]: https://jotaroraido.wordpress.com/2011/01/11/the-battle-of-donkey-kong/
The Initial Debut
Introduced in Super Smash Bros. Brawl, 75 m was originally designed after Nintendo’s home ports to the Famicom, NES, and Famicom Disk System and not the original arcade game, likely due to aforementioned circumstances at the time. This includes design aspects ranging from the layout to the sound effects. Nevertheless, some arcade elements still managed to find their way into the stage.
Layout
The layout of the stage is 1:1 with Nintendo’s home ports, however it is essential to point out that the stage layout was scaled exactly 1.25x horizontally during the modeling process. This could have been done to somewhat relieve the stage of its already cramped and cluttered battlefield or was in efforts of better fitting a widescreen aspect ratio, but if you were to ask me, I’d say the stage just looks prettier scaled this way over having a 1:1 ratio of voxel widths and heights.
The differences in layout between the arcade game and Nintendo’s home ports are subtle but identifiable. Here’s a side by side picture of the two. Think you can spot them all?
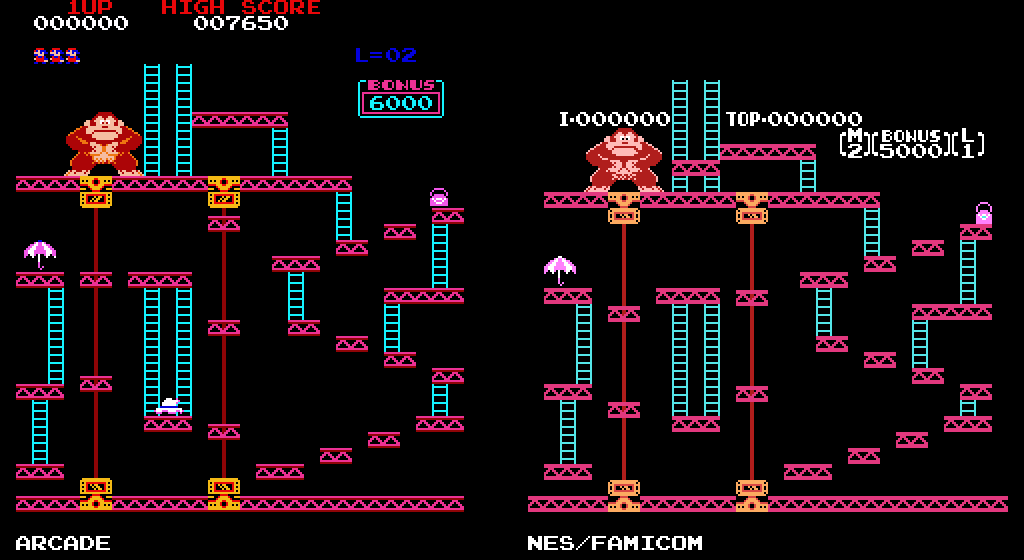
In Nintendo’s home ports, the girders ranging from the mid to high areas have all been lowered by one tile (eight pixels), the highest girder has been lowered by another one tile, and a girder has been inserted beside the bottom left of the highest one, intersecting the ladder tower Donkey Kong would climb once the player reaches Pauline. The lifts’ starting positions are another difference, but it’s one that doesn’t really carry over accurately to the Smash stage.
Knowing that, compare the Nintendo home port layout to the Brawl stage. Nearly identical, right? Brawl introduced one new element to the layout as well as a couple of minor changes to improve upon the gameplay experience. For starters, walk-offs were added to the sides of the stage. The girder Donkey Kong resides on extends further past the left side of the screen, possibly to illude that the off-screen jacks are rebounding off of a tangible surface. The entire right side of the stage was also extended to contain walk-offs, though others would likely agree that these make the stage look really odd when seen in full view and was simply an unnecessary addition.
In terms of changes to the layout, notably the bottom girder that spans more than the entire width of the stage has been transformed into a collisionless background object. This is also where the Pokémon Trainers are clustered. In addendum to the layout changes, the yellow lift mechanism segments containing a glass panel have been cut from the stage. The reason why is potentially due to the likelihood of entire characters becoming entirely obscured from view when they’d clip through. You’d even see them phase through around the sides due to the perspective camera view. Naturally, this assumes no collision is mapped around the objects, but a scenario where collision had been present would ruin the consistency of the stage’s collision as these objects would contain the only tangible walls and possibly ceilings in the stage. Ultimately, no collision for the remaining mechanism segments was the route the developers chose to take, so some clipping is inevitable.
Color Palette
For the main stage, reduced amounts of colors and a less vibrant palette were used as opposed to adopting the colors of the arcade level, much like the Nintendo home ports I had said the stage was designed after.
Viewing the different sides of the model reveals a technique being utilized called flat shading, where each polygon is uniformly shaded by lighting and takes on a variable luminosity based on the direction of its surface normal, achieving a polygonal appearance around the affected areas of the model. This is automatically being done by lighting rather than baking the shading into vertex color or a texture.
Sprites
It’s been reiterated that the stage was initially designed around its Nintendo home port counterpart, and that statement remains true… until the sprite-based elements are touched upon. This is the only area of the stage’s design where the artists chose to incorporate some of the sprite designs from the arcade game and position some of them accordingly as well. Call it a bit of a mixed bag, if you may.
- Donkey Kong is most notably seen assuming his arcade sprite. There’s a bit of a mystery surrounding this in that gameplay from an official arcade cabinet and Arcade Archives DONKEY KONG presents him with a pale skin tone, but a handful of unsourced captures display him as tan. There’s an archived screenshot of the game on the Super Mario Wiki dating back to mid-2005 with the tan skin tone, so it wouldn’t be too surprising if the artists simply referenced that for his texture.
- In contrast, Donkey Kong is positioned equivalent to his location in Nintendo’s home ports.
- Fireballs use a desaturated variant of their arcade palette, likely to better fit the overall saturation level of the stage. The pixel data of the sprite itself is the same between the arcade and Nintendo’s home ports.
- The left Fireball is placed at a unique starting position rather than one from the arcade game or Nintendo’s home ports, though the arcade is easily the closest to it. The right Fireball is placed suitably by its arcade starting position.
- Both the parasol and the bag were drawn using their respective Nintendo home port sprites, but since the hat was included with the stage while not appearing in Nintendo’s home ports, its arcade sprite was directly used instead.
- The parasol and the hat are placed by their arcade positions, though they’re set directly on the surface of the stage rather than hovering one unit above it, which is inaccurate to their source material. The bag is placed accurately by its position in Nintendo’s home ports.
- The jacks simply use their sprites from Nintendo’s home ports.
- The score board layout and textures are also identical to their Nintendo home port counterparts.
- They are positioned faithfully to Nintendo’s home ports, but the vertical position of the score board was lowered to fit within the camera boundary of the stage.
Sound Effects
Every sound effect specific to 75 m used its Nintendo home port counterparts. Nothing more to say about that.
Gameplay
Fighting on this stage is about what you’d expect—cramped, sporadic, and generally unfun to play on for a myriad of reasons. The intrusive hazards don’t help with the experience either. Though we’re not here to critique the gameplay, we’re here to learn! 75 m remains considerably faithful to Nintendo’s home ports, just as Sakurai-san intends with others’ properties in Smash. However, with the transition from a primitive 2D space to the diverse 3D world and a switch in game genre, some creative liberties had to be made in order to achieve a balance between accuracy and gameplay. The implementation of the original level obstacles as stage hazards and gimmicks as well as some specifications about the stage itself will be discussed along the way.
- Donkey Kong has a high chance of emerging from the background of the stage after some time with jacks always following. This period of inactivity alone considerably lessens the density of the jacks’ presence throughout the stage. Before he emerges, the background music’s volume is lowered to make way for the game start theme that plays to signal his imminent emergence. He will begin pounding his chest once the jacks are active, taking a small break every so often before descending back into the background. Donkey Kong will be active for 10 to 15 seconds and does 20% damage with mild knockback.
- Jacks will appear after a brief waiting period once Donkey Kong emerges and act practically the exact same as the original games, albeit slightly less frequent. Jacks are allowed to appear as long as Donkey Kong is active and do 20% damage with high knockback.
- Fireballs standby until the match begins and never despawn, exactly like the original games. They patrol the same set of platforms as they do in the originals as well. Their movement was made very plain though, as they don’t hop about surfaces or hop when moving between ladders. It’s very linear and lifeless. Fireballs do 10% damage with mild knockback.
- Lifts function the exact same way as they do in the original games, albeit shifting at a slightly faster pace than Nintendo’s home ports but slower than the arcade game.
- The original ten climbable ladders are present and functional within the stage. The two ladder towers at the top cannot be climbed here nor in the original games either.
- The parasol, hat, and bag all spawn immediately as the match is initialized. Each item will automatically be collected upon contact and will increment the score board by 800 points, the same score Nintendo’s home ports would award you when collecting an item on this level. Their functionality is identical to the original games with the exception that these items will respawn after being collected, any time between 20 and 26.6666667 seconds.
If you’ve played this stage at some point in the past, you may have been able to tell that the mechanic of jumping over a moving obstacle to get points from the original games has been scrapped entirely in this adaptation of the stage.
The initial camera boundary of the stage is represented through the following edge coordinates, representing -X, +Y, +X, -Y respectively: (-213, 220, 213, -50)
The initial blast zone of the stage is represented through the following edge coordinates, representing -X, +Y, +X, -Y respectively: (-243, 270, 243, -125)
The stage’s collision, now this is getting interesting. I’m not about to nerd-out or anything, I’m talking in the sense of discussing major flaws with it. Less importantly but still noteworthy to mention, the inability to drop through any platforms except when going down ladders. This can and will make traversing the stage a significantly and unnecessarily tedious task. It may be closer to it’s source content, but the design choice just does not fit well here for a game like this. Now to add the cherry on top, it’s time to learn about how the developers handled the stage’s ledge collisions. If you grab the ledge of a platform, you’ll be completely aligned with the platform. Seems normal, right? However, if you’re teetering over any ledge in the stage, grabbable or not, then you’ll be doing so in midair, so to speak. You may think at first that this is just a bug, but when looking at the below visual representation of the stage’s collisions, it’s clear that this was 100% intentional. The bottom platform collisions even have extra line segments to compensate for the on-par grabbable ledges. In a nutshell…
Flaws aside, the collision in this stage is merely made up of floors, so there are no walls or ceilings that you can come in contact with. Considering the nuisances, this allows a player to pass through surfaces from below, but not to drop through from above. The grabbable ledges in the stage are only present on the platforms that do not have any surfaces underneath it.
The Port to Super Smash Bros. for Wii U
It may seem like nothing too major has changed in the port to Super Smash Bros. for Wii U, but be that as it may, both many minor improvements and quality of life changes were made to the stage. First isn’t the worst here; the right walk-offs have thankfully been cut and are now left as normal-length platforms. Though second is definitely the best, as nearly the whole stage can now be dropped through, significantly improving mobility throughout the area. The only exceptions to this are the lifts, regions of a platform that hold a ladder on top of it, and platforms that lead directly down to the bottom blast line, though these exceptions are completely valid as they aim to prevent accidental self-destructions or from passing through the floor after moving down a ladder.
The only visual adjustments made to the stage itself were to both its color palette and shading. The color palette has received saturation gains, possibly to better fit Smash 4’s more vibrant aesthetic versus its predecessor. The flat shading around the sides of the stage was made a bit harsher and is now being done by a combination of both textures and vertex colors rather than lighting. Other elements besides the main stage received visual improvements as well. In no particular order:
- Jacks no longer draw in front of the stage and behind characters, and instead clip through everything like normal.
- Fireball sprite colors have had the desaturation received from Brawl reverted, now closely matching its arcade palette.
- Fireballs now alternate sprites every three frames instead of every two frames.
- A Z-fighting conflict between the Fireballs and the collectable items was resolved by shifting the items forward 0.1 units into the z-axis. However, Z-fighting between the Fireballs and the 800 points object was not yet resolved.
- The score board characters and the digits making up the awarded 800 points text were cleaned up to more uniformly scale each texel.
Believe it or not, there was actually a visual downgrade to the stage. All sprites are now using bilinear filtering instead of nearest neighbor filtering, meaning sprites may appear a bit blurry over appearing sharp. Why this is is beyond me.
The mechanics of this stage were accompanied with a couple of glaring mechanical flaws stemmed from Brawl and some minor details needing touching-up, so it’s nice to see nearly all of that refined in this title. Such changes and adjustments are, again, in no particular order:
- Tweaks to Donkey Kong’s parameters were made to reduce his time active from 10 to 15 seconds to only 5 to 10 seconds.
- The game start theme that plays when signaling Donkey Kong’s imminent emergence now completely overrides the background music instead of just lowering its volume.
- Fireballs now hop up and down ladders instead of only moving between them at a constant speed. They will also move down ladders at a faster rate of speed.
- A bugfix was made to the Fireball’s movement logic to prevent them from getting temporarily stuck at one of their path’s checkpoints.
In the stage’s level data file, the collisions remain practically identical to Brawl’s, unfortunately not fixing the strange collisions. The respawn points were adjusted to be evenly spread out horizontally between 36 unit intervals rather than packed entirely into the horizontal origin point. They were also all shifted upward to reside above the top-most platform instead of below it. The camera boundary was adjusted to (-170, 215, 170, -20) and the blast zone was adjusted to (-228, 270, 230, -125). Many of the item spawners saw numerous tweaks to their ranges and overall positioning. Lastly, this was one of the many stages in the game that was made able to support 8-Player Smash.
Omega Stage
Along with nearly every other stage in the game, 75 m received an Omega form. The layout accurately portrays Final Destination but with a flat and earlier underside. The only real gameplay difference between the two besides the underside is that this Omega stage is supported in 8-Player Smash whereas Final Destination for some reason isn’t, despite the stages having the exact same width and blast zone measurements. Perhaps this exclusion was the result of a performance problem, but it’s hard to know for certain.
The design of the main stage continues to portray 75 m as the lift mechanism base and wire were integrated into it as detail. The background represents 75 m’s layout but scattered about the outside of the playfield to leave the inside more open to breathing room during gameplay. It was also dimmed to help distinguish the main stage from the background. Donkey Kong, the Fireballs, and the collectable items all make an appearance as non-interactable background elements, however neither the jacks nor the score board are featured in the stage. All sprites are still presented in their disgusting bilinear glory. A couple of lasting things to briefly mention; the hat was moved from its original position to the top of the stage and the Fireballs’ precalculated animations did not account for the newly introduced hopping when moving between ladders.
This was an excellent start at rectifying the stage’s playability and its visual appeal, but let’s just say that this certainly wasn’t all that was left to come for the stage. Not even close.
The Ultimate Redesign
Fun Fact: 75 m was originally ported directly from Super Smash Bros. for Wii U to Ultimate as seen in Mr. Game & Watch’s fighter trailer. The publishing of this video was three days before the release of Arcade Archives DONKEY KONG in Japan, so the artists may have had the go to redesign the stage around then.
Fitting title, huh? 75 m was one of the few stages in Ultimate to receive a major aesthetic redesign beyond just receiving graphical updates, and it looks absolutely fantastic. Much was also done to tweak the hazards and overall experience of the stage to improve the value of matches on it. The stage has finally redeemed itself after its somewhat traumatic past iterations.
Layout
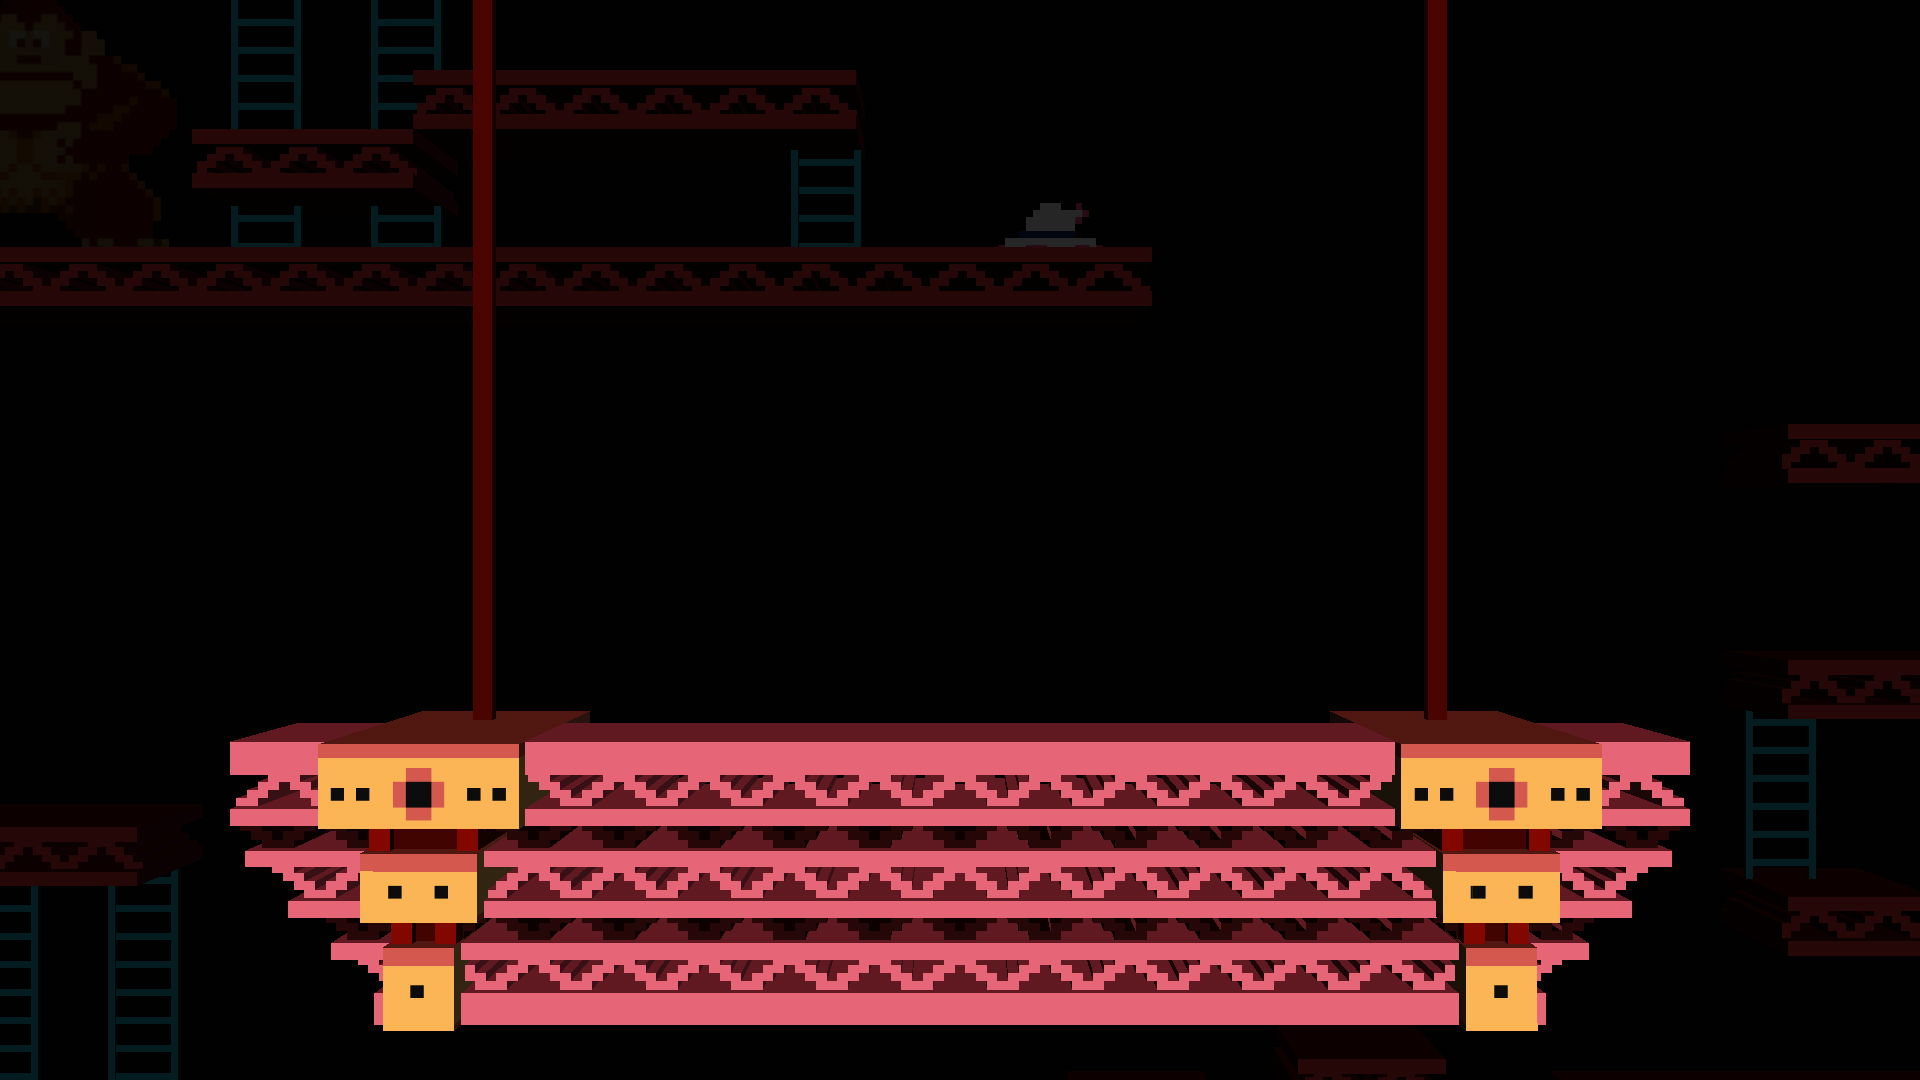
While the layout didn’t undergo any significant changes in the transition from Super Smash Bros. for Wii U to Ultimate as it did previously, there was one element in particular that was restored from the original games which was never present in the stage before. The cut segments from the yellow lift mechanism bases made their return, naturally resembling their arcade design. These parts still do not have any collision, but the updated camera makes up for most issues resulting from that.
Color Palette
The most significant change of them all, yet there’s not much to say about it. The stage’s color palette was overhauled to represent the original arcade game’s aesthetic in all of its glory. Flat shading is still used around the sides of the stage but the harshness of the shading from the previous installment was subtly toned down.
Sprites
The sprite-based elements too were updated to reflect the visual arcade redesign. First and foremost, all sprite textures now correctly utilize nearest neighbor texture filtering so each texel appears sharp like an old game would, rectifying the material errors from Super Smash Bros. for Wii U. Many of the stage’s sprites have also been swapped or recolored to conform with the arcade redesign.
- Donkey Kong’s sprites were recolored to give him his proper pale skin tone as he appears in official arcade gameplay.
- The jacks were redrawn to use their arcade sprites.
- Both the parasol and the bag were redrawn to use their arcade sprites as well. The hat did not receive this kind of change as it has used its arcade sprite from the start.
- Each item has been re-positioned vertically to be hovering over its homing surface than being set directly on it before.
The Fireballs, the score board and its layout went unchanged in regards to their design and appearance. One fix that involves the Fireballs, however, is that the last Z-fighting issue between the Fireballs and the 800 points object was resolved when the camera was converted from a perspective view to an orthographic view. Anything else that went unmentioned was not changed or adjusted.
Sound Effects
Every sound effect specific to 75 m has been replaced with their proper arcade counterparts.
Camera
The stage’s camera had quite the rethinking in Ultimate, which the changes made just work perfectly together. In addition to the camera being set at a fixed distance, it is now using an orthographic front view instead of a perspective view like most stages use, despite what somebody else may have told you in the past. To put it simply, all objects in the current viewpoint are drawn in such a way that, relative to the current camera angle, 3D space is interpreted in a 2D manner. If you’re interested in learning more, you can read Wikipedia’s article on orthographic projection.
These developments could have been aiming to emulate the source title’s original viewpoint, selling the idea even further that you are playing the original level from Donkey Kong but in Super Smash Bros. The more stationary in-game camera movement also allows the player to better focus on their fighter without having to deal with a sporadic or rapidly shifting camera, especially in battles with many players. For a stage with a such a poor reputation, these were considerable quality of life changes that should significantly improve the experience of the stage.
Gameplay
As if the list of improvements and adjustments couldn’t get any longer, even more was done to further improve the play experience of the stage. One particularly notable adjustment is that all of the collisions were fixed, thankfully. Retaining the collisions as-is and teetering over them with the newly introduced orthographic viewpoint would have made characters that “float” on it stick out like a sore thumb, so every collision was properly fitted to the lengths of their respective platform. However, this has introduced issues of its own, which MockRock’s video dissecting 75 m explains the exact cause and effect of between the provided timestamps (go watch the full video too, it’s really well-made).
More modifications made to the level data file follow:
- The camera boundary was adjusted to (-185, 205, 185, ~0.0) and the blast zone was adjusted to (-230, 270, 230, -80).
- The item spawner range that oversees the top of the stage was refitted to compensate for the adjusted camera boundary.
- The Pokémon Trainers’ placement was moved to the upper region of the stage.
- Ike’s Final Smash position was moved to the near-center of the screen.
- The likely candidate for this change was to prevent guaranteed one-hit K.O’s from occurring, but it additionally allows for a greater falling impact distance.
With level data changes now out of the way, some more stage-specific changes:
- Donkey Kong now pounds his chest whenever he does not activate. Previously, he would remain motionless in this state.
- Fireballs now spawn and despawn, flickering on imminent activity or disappearance—a trait not present in the original games and is unique only to this version of the stage.
- Fireballs were buffed to deal damage of 14.0%, or 16.8% with the 1-on-1 damage multiplier.
- Screen K.O’s and Star K.O’s are now disabled from occurring. This change stems from the stage’s new “two-dimensional” nature as K.O’s influenced visually by distance no longer appear correctly for the reason that there is no concept of depth in a two-dimensional field.
Ladder attacks are a universal technique introduced in Ultimate that allows a fighter to perform an aerial attack while attached to a ladder. This naturally applies to 75 m as the stage blatantly features a ladder gimmick. The technique is one that assists in relieving the restrictiveness of the stage and the element as a whole.
Starting in Ultimate, many items were disabled from being able to appear on certain stages for various reasons. Specifically on 75 m: the Moon, Andross, Kapp’n, Devil, and Nikki cannot be summoned as Assist Trophies, and Lunala cannot be summoned from a Poké Ball. On the Battlefield/Omega forms of the stage, only the Moon, Nikki, and Lunala cannot be summoned.
- The Moon cannot be summoned as a result of the orthographic viewpoint ruining the illusions of distance and depth, making the Moon purely look small instead of distant when the camera pans.
- Andross, unknown.
- Kapp’n cannot be summoned due to the heavily segmented and scattered platform layout, rendering him practically ineffective as an Assist Trophy in most areas of the stage.
- Devil likely cannot be summoned as the nature of the fixed-distance camera is disturbed both after spawning and despawning, but this is only a temporary side effect.
- Nikki cannot be summoned because her drawings in black lead would be obscured by the black background.
- Lunala, unknown.
The first half of Steve’s material gauge is set to start with dirt. The stage’s collision material is set entirely to the iron material, so Steve primarily mines iron from the stage as a result. The boundary Steve can place his blocks within is (-165, 187, 165, ~0.0).
Update Changelog
In Ver. 3.1.0, the first spawn position was shifted -7.0 units horizontally, the fifth and sixth spawn positions were swapped, and the new location of the fifth spawn position was shifted -2.0 units horizontally. Additionally, an incomplete set of VR camera parameters were appended to the stage’s normal-form .stprm file, albeit unused in the final game as the stage does not appear on the VR stage select screen.
In Ver. 4.0.0, the pause camera’s minimum zoom limit on each form was adjusted from 150 to 300.
The Technicalities
It’s about time to finally delve into the awesome innards of the stage. I’ll be going over virtually every known aspect to each hazard and element in the stage via an explanation or a data table. Said tables may include parameter value breakdowns from the stage’s .stdat file, details about hitboxes, or sets of coordinates, thus the use of tables will be abused quite a bit. All of this information is gathered from Ultimate, but it likely hasn’t changed much since Brawl.
Donkey Kong
Let’s begin traditionally with the ape himself.
| Hash Label | Type | Value | Description |
|---|---|---|---|
| rframe_kong_wait_1st | float | 900 | Frame timer for when Donkey Kong is initially allowed to activate. |
| rframe_kong_wait | float | 1200 | Frame timer for when Donkey Kong is subsequently allowed to activate. |
| rrate_kong_appear | float | 0.8 | A rate influencing the likelihood of Donkey Kong activating or not. A larger value means a greater chance of activating. |
| rframe_kong_appear | float | 30 | Frame timer for how long it takes Donkey Kong to move to his destination. |
| rframe_kong_stay_min | float | 300 | Minimum frame timer for how long Donkey Kong can stay for after emerging. |
| rframe_kong_stay_max | float | 600 | Maximum frame timer for how long Donkey Kong can stay for after emerging. |
Donkey Kong is initially placed at the coordinates (-91.5, 152, -36) during his inactive state and shifts to (-91.5, 152, -9) when entering his active state. He will remain stationed in his inactive state for an additional 322 frames during playback of the opening cutscene theme, which is the duration of the audio in frames when rounded down. The time it takes him to move between his current position and destination position depends on the value assigned to rframe_kong_appear, though the distance he moves per frame is always one unit, regardless of the value assigned to rframe_kong_appear. Considering the difference between positions on the z-axis is 27 units and the currently assigned value to rframe_kong_appear is 30, this causes Donkey Kong to automatically snap to a position where it takes him as many units to move to his destination as it does frames. The shading color applied to Donkey Kong when transitioning also experiences this jump. This explains the initial jerkiness as he transitions.
The dimming effect that’s applied over Donkey Kong is a multiplied grayscale color. It is stored in memory as linear floating point, but in-game is gamma converted to sRGB values. The color is either incremented or decremented linearly (255/54)/255 per frame with some slight floating-point rounding. The linear RGBA color while inactive is (0.5, 0.5, 0.5, 1) and the color while active is (1, 1, 1, 1). If the value assigned to rframe_kong_appear is high enough, values less than 0.0 and greater than 1.0 are possible in the transition, with the latter resulting in bloom (this does technically happen in vanilla but it’s unnoticeable).
Donkey Kong can pound his chest under two possible conditions—he either decides not to activate or he’s active and the jacks are currently active too. With the latter, he will begin pounding his chest one frame after the first jack appears and will stop one frame after all currently active jacks have despawned. With each chest pound, a sound effect accompanied by a controller rumble will play (which the rumble does not occur if Donkey Kong is inactive). These queues are hardcoded and are stored in frames as floating point. They play on the 1st, 30th, 60th, and 75th frames of the chest pounding animation and loop when the animation file loops. Beside the queues, a sound ID can be found. These sound IDs correlate to the ones found in the stage’s .nus3audio file and can be modified accordingly to change the played sound.
Donkey Kong’s hitbox parameters are entirely hardcoded, but fortunately I was able to gather all of the information I needed. His hitbox is active only when he has fully emerged with the given stats below. Be prepared for a screen full of data:
| Parameter | Type | Value | Description |
|---|---|---|---|
| offset_x | float | 0 | Relative X offset of the hitbox. |
| offset_y | float | 20.0* | Relative Y offset of the hitbox. |
| offset_z | float | 0 | Relative Z offset of the hitbox. |
| offset2_x | float | 0 | Relative X stretch offset of the hitbox. |
| offset2_y | float | 0 | Relative Y stretch offset of the hitbox. |
| offset2_z | float | 0 | Relative Z stretch offset of the hitbox. |
| power | float | 20 | Damage received from the hitbox. |
| size | float | 20 | Radius of the hitbox. |
| vector | int | 361 | Launch angle of the hitbox. |
| r_eff | int | 50 | Knockback growth of the hitbox. |
| r_fix | int | 0 | Fixed knockback of the hitbox. |
| r_add | int | 78 | Base knockback of the hitbox. |
| slip | float | 1 | Tripping chance from the hitbox. |
| stop_frame | float | 0 | Hitlag multiplier from the hitbox. |
| stop_delay | float | 1 | SDI multiplier from the hitbox. |
| node | hash40 | top |
Bone to bind the hitbox to. |
| target_category | byte | COLLISION_CATEGORY_MASK_ALL |
Bitflags to determine what hurtbox entity classes the hitbox is capable of interacting with. |
| target_situation | byte | COLLISION_SITUATION_MASK_ALL |
Bitflags to determine if the hitbox can hit opponents while grounded and/or airborne. |
| target_lr | bool | False | Unknown or no effect for stages by default. |
| target_part | byte | COLLISION_PART_MASK_ALL |
Bitflags to determine what parts of an interacting body a hitbox can hit. |
| attr | hash40 | collision_attr_normal |
Hit effect produced by the hitbox. |
| sound_level | byte | ATTACK_SOUND_LEVEL_M |
Sound effect intensity from the hitbox. |
| sound_attr | byte | COLLISION_SOUND_ATTR_KICK |
Sound effect produced by the hitbox. |
| set_off | bool | False | Unknown or no effect for stages by default. |
| no_scale | bool | False | Unknown or no effect for stages by default. |
| shield | bool | True | Unknown or no effect for stages by default. |
| reflector | bool | False | Unknown or no effect for stages by default. |
| absorber | bool | False | Unknown or no effect for stages by default. |
| direct | bool | False | If the hitbox is considered "Specials: Direct" |
| no_invincible | bool | False | Unknown or no effect for stages by default. |
| no_xlu | bool | False | Unknown or no effect for stages by default. |
| lr_check | byte | ATTACK_LR_CHECK_POS |
Launch direction setting based off of the opponent's facing direction or position. |
| catch | bool | False | Unknown or no effect for stages by default. |
| no_team | bool | False | If the hitbox can hit when Team Attack is off. (no effect for stages) |
| no_stop | bool | False | If hitlag from the hitbox is disabled. |
| no_effect | bool | False | If graphical hit effects are disabled from being produced. |
| speed | bool | False | If the hitbox is considered flinchless. |
| region | byte | ATTACK_REGION_NONE |
Spirit trait modifier for the hitbox. (no effect for stages) |
| ignore_down | bool | False | If the hitbox will ignore downed opponents. |
| check_type | byte | COLLISION_SHAPE_TYPE_SPHERE |
Shape of the hitbox. |
| sub_shield | ushort | 0 | Shield damage received from the hitbox. |
| camera_quake | byte | CAMERA_QUAKE_KIND_INVALID |
Camera shake motion that occurs when the hitbox hits. |
| serial_hit_frame | uint | 60 | Frames until the hitbox can rehit an attacked opponent. |
Jacks
| Hash Label | Type | Value | Description |
|---|---|---|---|
| rframe_jack_wait_min_1st | float | 60 | Unused. |
| rframe_jack_wait_max_1st | float | 120 | Unused. |
| rframe_jack_wait_min | float | 0.8 | Minimum frame timer for (additional) delay before start of jack activity.* |
| rframe_jack_wait_max | float | 120 | Maximum frame timer for (additional) delay before start of jack activity.* |
| rrate_jack_appear | float | 1 | A rate influencing the likelihood of a jack pair appearing or not. A larger value means a greater chance of activating. |
| rframe_jack_stay_min | float | 900 | Minimum frame timer for how long the jacks can be active for. |
| rframe_jack_stay_max | float | 900 | Maximum frame timer for how long the jacks can be active for. |
| rframe_jack_interval_min | float | 190 | Minimum frame timer for delaying the spawning of the second jack in a pair.* |
| rframe_jack_interval_max | float | 190 | Maximum frame timer for delaying the spawning of the second jack in a pair.* |
| rx_jack_offset | float | 30 | Horizontal offset variance for each jack's animation. Value represents positive and negative offset ranges separately. |
Each set of jacks can only contain two jacks at a time, regardless of what you edit the .stdat file’s parameters to be. The first jack in the set will respawn after the amount of frames defined in jack_danger_param::active_frame and the following jack will respawn after the decided amount of frames between rframe_jack_interval_min and rframe_jack_interval_max. Donkey Kong’s descent will call off a new set from appearing at some point, thus terminating jack activity until Donkey Kong becomes active again.
As far as animation goes, the jacks simply work off of one animation file that maps out their fixed jumping and falling route as well as setting manual keyframes for when the sprite should alternate. For each jack, its animation will be horizontally offset by a random number within the range defined by rx_jack_offset. This is the exact same behavior as the original games, but the key difference here is the increased precision of available numbers to offset by. Smash can offset the jacks by single-precision floating-point numbers while the original games can only offset by integer or by pixel.
Sound effect queues are set up the same way as Donkey Kong’s, although without the controller rumble. The jump sound is played on the 1st, 29th, 59th, 89th, and 119th frame of animation and the fall sound is presumably played on the 149th frame. Only one jack can play its sound effects at a time, leaving the other jack mute until it can play through its remaining queues uninterrupted, if applicable. This priority system can be manipulated, however. Through the hit_stop_frame parameter, a jack can be stalled in place for a fixed amount of time when hitting an opponent. If this causes the stalled jack to fail in meeting its one-frame window to play its next sound effect and another jack beats it to it, then that jack will take priority in playing its sound effects. Despite the delay from hit_stop_frame carrying over to a new set during the active cycle, results of priority from previous sets may vary.
The jacks’ hitboxes are partially defined through the stage’s .stdat file this time as opposed to being entirely hardcoded. Two sets of hitboxes exist for each jack, the first for its initial entry and the second for 90 frames into its animation, swapping out the initial stronger hitbox with that of a weaker one when the second jack in the set approximately enters the field of view. This routine occurs for the second jack in the set as well. A smaller knockback growth value is used for the second hitbox to limit the scaling of the knockback for higher player damage percentages to balance out gameplay. The hitbox data is shared between both jacks, but this data is loaded into memory as separate hitboxes for each jack in only one set (four hitbox objects total). Here you can see the hitbox data that’s stored in the stage’s .stdat file. 0 and 1 represent the first and second hitboxes respectively.
| Hash Label | Type | Value (0) | Value (1) | Description |
|---|---|---|---|---|
| jack_attacks::radius | float | 10 | 10 | Radius of the hitbox. |
| jack_attacks::power | float | 20 | 20 | Damage received from the hitbox. |
| jack_attacks::vec | int | 20 | 20 | Launch angle of the hitbox. |
| jack_attacks::r_eff | int | 50 | 42 | Knockback growth of the hitbox. |
| jack_attacks::r_fix | int | 0 | 0 | Fixed knockback of the hitbox. |
| jack_attacks::r_add | int | 90 | 90 | Base knockback of the hitbox. |
| jack_attacks::stop_frame | float | 1 | 1 | Hitlag multiplier from the hitbox. |
| jack_attacks::stop_delay | float | 1 | 1 | SDI multiplier from the hitbox. |
| jack_attacks::hit_stop_frame | float | 20 | 20 | Frames of hitlag to the jacks. |
And here are all of the hardcoded parameters:
| Parameter | Type | Value (0 and/or 1) | Description |
|---|---|---|---|
| offset_x | float | 0 | Relative X offset of the hitbox. |
| offset_y | float | 8.0* | Relative Y offset of the hitbox. |
| offset_z | float | 0 | Relative Z offset of the hitbox. |
| offset2_x | float | 0 | Relative X stretch offset of the hitbox. |
| offset2_y | float | 0 | Relative Y stretch offset of the hitbox. |
| offset2_z | float | 0 | Relative Z stretch offset of the hitbox. |
| slip | float | 1 | Tripping chance from the hitbox. |
| node | hash40 | top |
Bone to bind the hitbox to. |
| target_category | byte | COLLISION_CATEGORY_MASK_ALL |
Bitflags to determine what hurtbox entity classes the hitbox is capable of interacting with. |
| target_situation | byte | COLLISION_SITUATION_MASK_ALL |
Bitflags to determine if the hitbox can hit opponents while grounded and/or airborne. |
| target_lr | bool | False | Unknown or no effect for stages by default. |
| target_part | byte | COLLISION_PART_MASK_ALL |
Bitflags to determine what parts of an interacting body a hitbox can hit. |
| attr | hash40 | collision_attr_normal |
Hit effect produced by the hitbox. |
| sound_level | byte | ATTACK_SOUND_LEVEL_L |
Sound effect intensity from the hitbox. |
| sound_attr | byte | COLLISION_SOUND_ATTR_KICK |
Sound effect produced by the hitbox. |
| set_off | bool | False | Unknown or no effect for stages by default. |
| no_scale | bool | False | Unknown or no effect for stages by default. |
| shield | bool | True | Unknown or no effect for stages by default. |
| reflector | bool | False | Unknown or no effect for stages by default. |
| absorber | bool | False | Unknown or no effect for stages by default. |
| direct | bool | False | If the hitbox is considered "Specials: Direct" |
| no_invincible | bool | False | Unknown or no effect for stages by default. |
| no_xlu | bool | False | Unknown or no effect for stages by default. |
| lr_check | byte | ATTACK_LR_CHECK_POSATTACK_LR_CHECK_F |
Launch direction setting based off of the opponent's facing direction or position. |
| catch | bool | False | Unknown or no effect for stages by default. |
| no_team | bool | False | If the hitbox can hit when Team Attack is off. (no effect for stages) |
| no_stop | bool | False | If hitlag from the hitbox is disabled. |
| no_effect | bool | False | If graphical hit effects are disabled from being produced. |
| speed | bool | False | If the hitbox is considered flinchless. |
| region | byte | ATTACK_REGION_NONE |
Spirit trait modifier for the hitbox. (no effect for stages) |
| ignore_down | bool | False | If the hitbox will ignore downed opponents. |
| check_type | byte | COLLISION_SHAPE_TYPE_SPHERE |
Shape of the hitbox. |
| sub_shield | ushort | 0 | Shield damage received from the hitbox. |
| camera_quake | byte | CAMERA_QUAKE_KIND_INVALID |
Camera shake motion that occurs when the hitbox hits. |
| serial_hit_frame | uint | 60 | Frames until the hitbox can rehit an attacked opponent. |
Lifts
| Hash Label | Type | Value | Description |
|---|---|---|---|
| lift_normal_speed | float | 0.25 | Lift primary speed. |
| lift_high_speed | float | 0.45 | Lift secondary speed. |
| lift_speed_change_frame_min | float | 1800 | Minimum frame timer for when the lifts can change their speed. |
| lift_speed_change_frame_max | float | 2400 | Maximum frame timer for when the lifts can change their speed. |
| lift_collision::x1 | float | -8.75 | Horizontal coordinate of the first collision vertex. |
| lift_collision::y1 | float | 4.0 | Vertical coordinate of the first collision vertex. |
| lift_collision::x2 | float | 8.75 | Horizontal coordinate of the second collision vertex. |
| lift_collision::y2 | float | 4.0 | Vertical coordinate of the second collision vertex. |
For the left set of lifts, the minimum position is set to (-91.507, -4, 0) and the maximum position is set to (-91.507, 147.5, 0). For the right set of lifts, the minimum position is (-11.507, -4, 0) and the maximum position is (-11.507, 147.5, 0). This range is what the lifts in Super Smash Bros. for Wii U were adjusted to from their original positions in Brawl for unknown reasons. How the game determines the lifts’ starting positions between these coordinate pairs is actually very simple. Instead of defining starting positions using coordinates, thresholds are used on either a positive or negative scale, ideally ranging from 0.0 to (-)1.0. If the threshold value is positive, the minimum position is used as the threshold for 0.0 and the maximum position is used for 1.0. Positive values will shift the lift upwards. If the threshold value is negative, the maximum position is instead used as the threshold for 0.0 and the minimum position is used for -1.0. Negative values will shift the lift downwards. The starting threshold values for the left set of lifts are 0.33333334, 0.6666667, and 1.0 respectively, and for the right set of lifts are -0.33333334, -0.6666667, and -1.0 respectively.
Moving towards the topic of collisions, the lift’s collision is only defined once as seen in the parameter table and is instanced by the game from there. Like standard collisions, they are equipped with a unit vector, a material, and attributes.
- The unit vector is a two-float vector that acts as a surface normal for a two-dimensional surface. It determines which side of the collision is tangible to interacting entities. The lift’s collision has a unit vector of (0, 1).
- The material determines how a surface is visually, audibly, and at times physically interacted with. Alongside the rest of the stage’s collision, the assigned material is
GROUND_COLL_ATTR_IRON. - Attributes enable or disable properties that a collision can retain, such as the ability to drop-through, grabbable ledges, etc. The collision only has one flag set but it goes unused in the final game,
FLAG_PACKMAN_FINAL_IGNORE.- This flag is presumably a leftover from Smash 4 that would flag a collision line segment as intangible to PAC-MAN’s Final Smash at the time as Super PAC-MAN could once collide with surfaces, but the flag seems to go unused in that game too as no noticeable effects can be seen with it enabled. Super PAC-MAN no longer collides with surfaces anymore so the flag has no real functionality.
Fireballs
| Hash (Label) | Type | Value | Description |
|---|---|---|---|
| rspeed_jyama | float | 0.25 | Fireball speed. |
| rspeed_jyama_ladder_down | float | 2 | Fireball down speed multiplier, relative to rspeed_jyama. |
| rspeed_jyama_chase | float | 2 | Unused. |
| rrate_jyama_movex | float | 0.5 | Fireball horizontal movement chance. |
| rrate_jyama_movey | float | 0.3 | Fireball vertical movement chance. |
| 0x12c5f54fe1 | float | 5 | Unused? |
| rframe_jyama_search | float | 2 | Frame timer for how long a Fireball will halt at a checkpoint for. |
| fireball_1st_disappear_frame_min | float | 600 | Minimum frame timer for when a Fireball will initially appear. |
| fireball_1st_disappear_frame_max | float | 720 | Maximum frame timer for when a Fireball will initially appear. |
| fireball_appear_frame_min | float | 1600 | Minimum frame timer for how long a Fireball will be active for. |
| fireball_appear_frame_max | float | 2600 | Maximum frame timer for how long a Fireball will be active for. |
| fireball_disappear_frame_min | float | 2000 | Minimum frame timer for how long a Fireball will disappear for. |
| fireball_disappear_frame_max | float | 3000 | Maximum frame timer for how long a Fireball will disappear for. |
| fireball_appear_blink_frame | float | 60 | Frame timer for how long a Fireball will blink for when entering. |
| fireball_disappear_blink_frame | float | 60 | Frame timer for how long a Fireball will blink for when leaving. |
| fireball_blink_interval_frame | float | 2 | Frame timer for the interval between blinking visbility on a Fireball. |
Fireball movement is performed entirely procedurally. It references predefined sets of hardcoded coordinate checkpoints to travel between and uses linear interpolation to shift around at a constant speed.
| X Coordinate | Y Coordinate | Z Coordinate | |
|---|---|---|---|
| Left Fireball Point 1 | -36.5 | 104.0 | 0.0 |
| Left Fireball Point 2 | -36.5 | 40.0 | 0.0 |
| Left Fireball Point 3 | -56.5 | 40.0 | 0.0 |
| Left Fireball Point 4 | -56.5 | 104.0 | 0.0 |
| Left Fireball Point 5 | -66.5 | 104.0 | 0.0 |
| X Coordinate | Y Coordinate | Z Coordinate | |
|---|---|---|---|
| Right Fireball Point 1 | 133.5 | 136.0 | 0.0 |
| Right Fireball Point 2 | 123.5 | 136.0 | 0.0 |
| Right Fireball Point 3 | 133.5 | 96.0 | 0.0 |
| Right Fireball Point 4 | 123.5 | 96.0 | 0.0 |
| Right Fireball Point 5 | 93.5 | 96.0 | 0.0 |
| Right Fireball Point 6 | 103.5 | 64.0 | 0.0 |
| Right Fireball Point 7 | 93.5 | 64.0 | 0.0 |
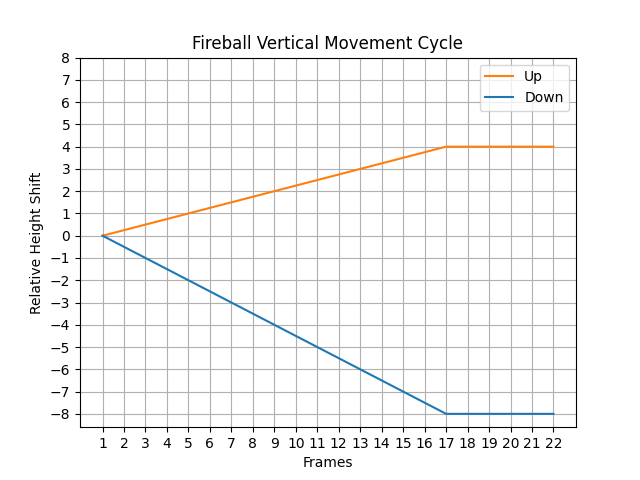
Additionally, Fireballs will repeatedly hop when climbing up or down ladders, a welcome detail introduced in Super Smash Bros. for Wii U that brings out more life in their animation. One hop cycle is visualized in the graph below. The lines’ slopes are based off of the speeds that the vanilla game uses.
A Fireball’s current hop cycle will be terminated if it has reached its destination checkpoint or it will have been temporarily interrupted if it has decided to despawn. A Fireball will respawn in the same position it despawned in and will resume its route and hop cycle, if applicable, from where it left off before.
A Fireball’s hitbox is only active when it is moving around. The hitbox data is shared between both Fireballs, but gets loaded into memory as a separate hitbox for each Fireball. Some of their hitbox data is stored in the stage’s .stdat file:
| Hash Label | Type | Value | Description |
|---|---|---|---|
| fireball_attack_sphere_radius | float | 3.5 | Radius of the Fireball's hitbox. |
| fireball_attack_power | float | 14 | Damage received from the Fireball's hitbox. |
| fireball_attack_vector | int | 40 | Launch angle of the Fireball's hitbox. |
| fireball_attack_r_eff | int | 50 | Knockback growth of the Fireball's hitbox. |
| fireball_attack_r_fix | int | 0 | Fixed knockback of the Fireball's hitbox. |
| fireball_attack_r_add | int | 70 | Base knockback of the Fireball's hitbox. |
The rest, however, is all hardcoded:
| Parameter | Type | Value | Description |
|---|---|---|---|
| offset_x | float | 0 | Relative X offset of the hitbox. |
| offset_y | float | 5.0* | Relative Y offset of the hitbox. |
| offset_z | float | 0 | Relative Z offset of the hitbox. |
| offset2_x | float | 0 | Relative X stretch offset of the hitbox. |
| offset2_y | float | 0 | Relative Y stretch offset of the hitbox. |
| offset2_z | float | 0 | Relative Z stretch offset of the hitbox. |
| slip | float | 1 | Tripping chance from the hitbox. |
| stop_frame | float | 0 | Hitlag multiplier from the hitbox. |
| stop_delay | float | 1 | SDI multiplier from the hitbox. |
| node | hash40 | top |
Bone to bind the hitbox to. |
| target_category | byte | COLLISION_CATEGORY_MASK_ALL |
Bitflags to determine what hurtbox entity classes the hitbox is capable of interacting with. |
| target_situation | byte | COLLISION_SITUATION_MASK_ALL |
Bitflags to determine if the hitbox can hit opponents while grounded and/or airborne. |
| target_lr | bool | False | Unknown or no effect for stages by default. |
| target_part | byte | COLLISION_PART_MASK_ALL |
Bitflags to determine what parts of an interacting body a hitbox can hit. |
| attr | hash40 | collision_attr_fire |
Hit effect produced by the hitbox. |
| sound_level | byte | ATTACK_SOUND_LEVEL_M |
Sound effect intensity from the hitbox. |
| sound_attr | byte | COLLISION_SOUND_ATTR_FIRE |
Sound effect produced by the hitbox. |
| set_off | bool | False | Unknown or no effect for stages by default. |
| no_scale | bool | False | Unknown or no effect for stages by default. |
| shield | bool | False | Unknown or no effect for stages by default. |
| reflector | bool | False | Unknown or no effect for stages by default. |
| absorber | bool | False | Unknown or no effect for stages by default. |
| direct | bool | False | If the hitbox is considered "Specials: Direct" |
| no_invincible | bool | False | Unknown or no effect for stages by default. |
| no_xlu | bool | False | Unknown or no effect for stages by default. |
| lr_check | byte | ATTACK_LR_CHECK_POS |
Launch direction setting based off of the opponent's facing direction or position. |
| catch | bool | False | Unknown or no effect for stages by default. |
| no_team | bool | False | If the hitbox can hit when Team Attack is off. (no effect for stages) |
| no_stop | bool | False | If hitlag from the hitbox is disabled. |
| no_effect | bool | False | If graphical hit effects are disabled from being produced. |
| speed | bool | False | If the hitbox is considered flinchless. |
| region | byte | ATTACK_REGION_NONE |
Spirit trait modifier for the hitbox. (no effect for stages) |
| ignore_down | bool | False | If the hitbox will ignore downed opponents. |
| check_type | byte | COLLISION_SHAPE_TYPE_SPHERE |
Shape of the hitbox. |
| sub_shield | ushort | 0 | Shield damage received from the hitbox. |
| camera_quake | byte | CAMERA_QUAKE_KIND_INVALID |
Camera shake motion that occurs when the hitbox hits. |
| serial_hit_frame | uint | 60 | Frames until the hitbox can rehit an attacked opponent. |
Pauline’s lost items
| Hash Label | Type | Value | Description |
|---|---|---|---|
| rframe_lost_wait_min_1st | float | 0 | Minimum frame timer for Pauline's lost items to initially appear. |
| rframe_lost_wait_max_1st | float | 0 | Maximum frame timer for Pauline's lost items to initially appear. |
| rframe_lost_wait_min | float | 1200 | Minimum frame timer for Pauline's lost items to respawn after being collected. |
| rframe_lost_wait_max | float | 1600 | Maximum frame timer for Pauline's lost items to respawn after being collected. |
| rsize_lost | float | 27 | Axis-aligned bounding box collision width and height measurements for each of Pauline's lost items. |
The items are positioned through the model itself and their collision positions are hardcoded, contrary to literally everything else in the stage that has one hardcoded position each to move both the model and the collision (good consistency, devs /s). A small table listing the coordinates of each item’s model and collision can be found below:
| X Coordinate | Y Coordinate | Z Coordinate | |
|---|---|---|---|
| Parasol | -126.5 | 104.0 | 0.0 |
| Hat | -46.5 | 40.0 | 0.0 |
| Bag | 133.5 | 136.0 | 0.0 |
Hitboxes in this game are primarily made up of spheres and sometimes capsules that execute some sort of action when contact is made with other actionable collision shapes. The items are unique in the case that they utilize an axis-aligned bounding box collision that will trigger its collected state when a fighter’s Trans joint, or for you ACMD nerds, a fighter’s top bone intersects the bounding box collision for at least one frame. In other words, your fighter’s current position is what gets considered in intersecting the bounding box collision instead of your hurtboxes. The bounding box’s origin is its center, relative to its assigned position.
On a final note with the items, something extremely interesting I discovered is that each item has their own code for incrementing the score board, so theoretically all three items can easily be reprogrammed to add or even subtract their own unique values to the score.
CPU Danger Regions
| Hash Label | Type | Value | Description |
|---|---|---|---|
| jack_danger_param::active_frame | float | 120 | Frame timer base to activate and respawn the jacks. |
| jack_danger_param::min_x | float | 73.5 | Left edge coordinate of boundary. |
| jack_danger_param::min_y | float | -40 | Bottom edge coordinate of boundary. |
| jack_danger_param::max_x | float | 113.5 | Right edge coordinate of boundary. |
| jack_danger_param::max_y | float | 190 | Top edge coordinate of boundary. |
| kong_danger_param::active_frame | float | 120 | Frame timer to activate the danger boundary. |
| kong_danger_param::min_x | float | -270 | Left edge coordinate of boundary. |
| kong_danger_param::min_y | float | 140 | Bottom edge coordinate of boundary. |
| kong_danger_param::max_x | float | 113.5 | Right edge coordinate of boundary. |
| kong_danger_param::max_y | float | 190 | Top edge coordinate of boundary. |
These sets of parameters signal CPU players when and where a region in the stage is considered dangerous and should be avoided. The boundary under kong_danger_param maps out the jacks’ jumping region and jack_danger_param maps out the jacks’ falling region. kong_danger_param::active_frame begins its timer to activate the boundary when Donkey Kong has ascended and is terminated when he begins to descend. The boundary tied to jack_danger_param becomes active when Donkey Kong begins to ascend and terminates when both Donkey Kong and the jacks are inactive.
Ladders
Each ladder has its own set of coordinates to position both the model and its bounding box collision as well as parameters defining the horizontal and vertical ranges of the collision. Models are linked through a basic plaintext string of the desired model folder name.
| Model Folder | X Coordinate | Y Coordinate | Z Coordinate | Width | Height |
|---|---|---|---|---|---|
| stc_hasigo_01_set | -126.5 | 16.0 | 0.0 | 10.0 | 40.0 |
| stc_hasigo_02_set | -116.5 | 56.0 | 0.0 | 10.0 | 48.0 |
| stc_hasigo_03_set | -56.5 | 40.0 | 0.0 | 10.0 | 64.0 |
| stc_hasigo_04_set | -36.5 | 40.0 | 0.0 | 10.0 | 64.0 |
| stc_hasigo_05_set | 33.5 | 80.0 | 0.0 | 10.0 | 32.0 |
| stc_hasigo_06_set | 123.5 | 40.0 | 0.0 | 10.0 | 15.8 |
| stc_hasigo_07_set | 93.0 | 64.0 | 0.0 | 10.0 | 32.0 |
| stc_hasigo_08_set | 123.5 | 96.0 | 0.0 | 10.0 | 40.0 |
| stc_hasigo_09_set | 63.5 | 120.0 | 0.0 | 10.0 | 32.0 |
| stc_hasigo_10_set | 23.5 | 152.0 | 0.0 | 10.0 | 24.0 |
The defined heights go beyond the actual heights of the ladder models themselves. They are instead from the bottom of the ladder to the platform’s surface it leads up to, otherwise you’d fall down the ladder after making your way up it.
Score Board
Each digit in the score board is made up of an instanced plane model between the following hardcoded coordinates:
| X Coordinate | Y Coordinate | Z Coordinate | |
|---|---|---|---|
| Hundred Thousands | -116.5 | 195.0 | 0.0 |
| Ten Thousands | -106.5 | 195.0 | 0.0 |
| Thousands | -96.5 | 195.0 | 0.0 |
| Hundreds | -86.5 | 195.0 | 0.0 |
| Tens | -76.5 | 195.0 | 0.0 |
| Ones | -66.5 | 195.0 | 0.0 |
| X Coordinate | Y Coordinate | Z Coordinate | |
|---|---|---|---|
| Hundred Thousands | 5.5 | 195.0 | 0.0 |
| Ten Thousands | 15.5 | 195.0 | 0.0 |
| Thousands | 25.5 | 195.0 | 0.0 |
| Hundreds | 35.5 | 195.0 | 0.0 |
| Tens | 45.5 | 195.0 | 0.0 |
| Ones | 55.5 | 195.0 | 0.0 |
The display score works loosely by updating the parameters assigned to CustomVector18 in its animation file, a material property dedicated to handling sprite sheet animations. When coupled with the enabling of CustomBoolean9, you can specify which sprite to fixate on for that particular frame of animation, which the animation assigns each digit a frame. My educated guess is that each display score digit in the score board is updated to a specific frame depending on what number is assigned to its placement.
The score counter in memory is made up of two separate values, the current score and the high score. The data types are signed 32-bit integers. There is a defined hardcoded counter limit of 999,999. Attempting to go beyond this limit in vanilla will result in the score staying fixed at 999,999. Removing it will cause the display score to fix itself at 999,999 but the two counters in memory continue to increment. Once the counter enters the negative range of numbers, the display score clamps to 0. Eventually the current score will loop back normally, but the high score counter remains fixed at -1, or 0xFFFFFFFF in hexadecimal, which is 0 as far as the display score is concerned.
The current score is the only one that is truly being incremented to, as the high score is just being assigned the value of the current score. If you’re interested in how the score counter is calculated and stored at its core, here is snippet of the relevant assembly code:
mov     w20,#0x423f
mov     w20,#0xf, LSL #16       ; int maximum_score = 999999;
...
ldr     w8,[x19, #DAT_000009c8] ; Load word from current score memory address into register w8
ldr     w9,[x19, #DAT_000009cc] ; Load word from high score memory address into register w9
add     w8,w8,#0x320            ; w8 = w8 + 800
cmp     w8,w20                  ; ??? w8 - w20, get condition code and discard result
csel    w8,w8,w20,cc            ; ???
cmp     w9,w8                   ; ??? w9 - w8, get condition code and discard result
str     w8,[x19, #DAT_000009c8] ; Store word from register w8 into memory at current score memory address
b.cs    LAB_71025d2798          ; ??? Branch if unsigned higher or same
str     w8,[x19, #DAT_000009cc] ; Store word from register w8 into memory at high score memory address
Sound Effects
| Sound Label | ID | Sample Rate | Sample Count | Channel Count | db Gain | Description |
|---|---|---|---|---|---|---|
se_stage_75m_01 |
0 | 48000 Hz | 257792 | Mono | -5.0 | Opening cutscene theme. |
se_stage_75m_02 |
1 | 48000 Hz | 24320 | Mono | -5.0 | Donkey Kong chest pound. |
se_stage_75m_03 |
2 | 48000 Hz | 13323 | Mono | -5.0 | Jack jump. |
se_stage_75m_04 |
3 | 48000 Hz | 71109 | Mono | -5.0 | Jack fall. |
se_stage_75m_05 |
4 | 48000 Hz | 32420 | Mono | -8.0 | Collected item. |
Conclusion
Comprehensive research like this begs the question: What did all of this research do for me in the end? Well, frankly a lot of it isn’t all that useful as it’s largely independent to 75 m. On the flipside, this adventure has provided me with a new level of knowledge about the game, techniques, and information in a broad scope of subjects, though I’ll spare you the details. There’s an abundant amount of work that goes into stages that we may normally not take notice of, and learning about all of those things has truly put my researching and learning abilities to the test.
Though, what else? Might have I missed something? What exactly was it that motivated me to carry out this research? Well, I think it’s about time for me to proudly present and release 25 m, a complete replacement for 75 m.
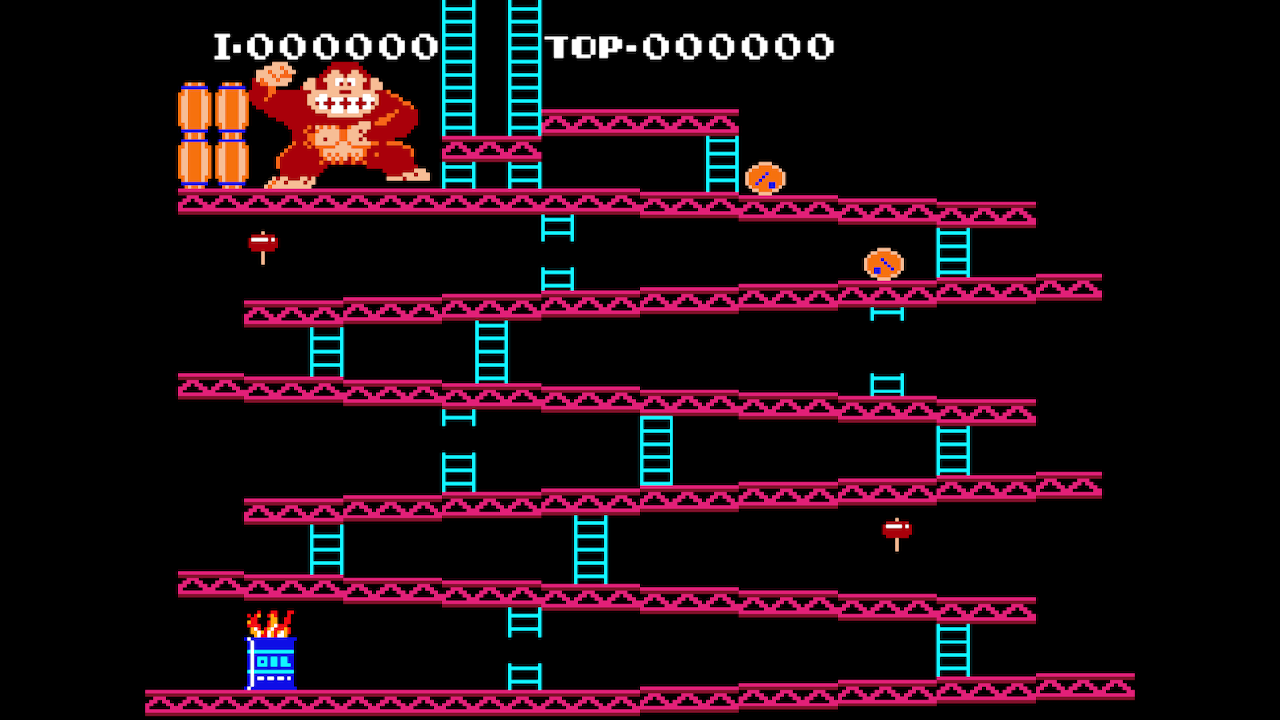
This mod comes fully equipped with everything you should expect from a full stage replacement, including Battlefield and Omega forms. Notably it comes acquainted with an open-source Skyline plugin to change necessary hardcoded data from the original stage to better fit 25 m, something no stage mod for Ultimate has done before. But with modding comes limitations to both resources and skill. The stage is not a 1:1 replica of the original level when it comes to the barrels and hammers. You’ll likely understand why if and when you get around to trying out the mod.
Anyways, I hope this was interesting to read, and congratulations if you made it all the way through to the end. I’m not sure if I’ll ever do something like this again in the future as writing this has been a considerably draining experience. Downloads for 25 m can be found below. Have fun!